
Stylus-based system for measuring film thickness, step height, and surface roughness. Provides high-resolution surface profiles. Used for thin film and microfabrication characterization.
Model: Bruker Dektak XT
Location: SE1 153E
Sylus offered: 2 and 0.7 µm.
Profilometer Basics and Liturature
The Most Advanced Stylus Profiler Ever | Bruker Dektak Pro
Surface Edit LinkProfilometer — Bruker DektakPro Stylus Profiler
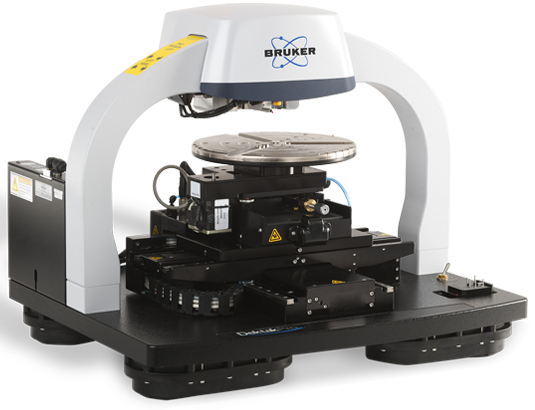
The Bruker DektakPro Stylus Profilometer is a high-precision surface metrology system used to measure thin and thick film step height, surface roughness, waviness, and topography. It utilizes a diamond-tipped stylus that scans across the sample surface to generate accurate 2D and 3D surface profiles.
Key Features
- Stylus-based contact profilometry with nanometer-scale resolution
- Step height repeatability ~5 Å (<0.6 nm)
- Programmable scan parameters (length, speed, stylus force)
- Adjustable stylus force (typically ~1–15 mg range)
- Manual or automated X-Y stage positioning
- 2D line profiling and optional 3D surface mapping
- Vision64 software for data acquisition and analysis
How It Operates
- A diamond-tipped stylus is brought into contact with the sample surface
- The stylus scans laterally across the surface
- Vertical displacement is detected using an LVDT sensor system
- Surface variations are converted into electrical signals and digitized
- Data is processed and analyzed using integrated software tools
Typical Operation Workflow
- Power on system and initialize software (Vision64)
- Mount sample on stage and align under stylus
- Adjust illumination and positioning using camera view
- Set scan parameters (length, force, speed)
- Lower stylus to surface and initiate scan
- Collect profile data during scan
- Analyze thickness, roughness, or topography
- Save/export measurement results
System Components
- Measurement head with stylus and optical camera
- Diamond-tipped stylus and sensor assembly
- Manual or automated X-Y sample stage
- Scan stage for controlled motion
- Signal processor and control electronics
- Environmental enclosure for vibration and noise isolation
- Computer with Vision64 analysis software
Applications
- Thin film thickness and step height measurement
- Surface roughness and texture analysis
- Wafer stress and warpage characterization
- Microfabrication process verification
- Coating and material surface evaluation
Training and Usage
Users are trained on:
- Sample mounting and alignment
- Stylus positioning and force selection
- Scan parameter setup and optimization
- Data analysis using Vision64 software
- Safe handling of stylus and system components
Safety Considerations
- Stylus tip is delicate — avoid excessive force or collisions
- Moving stages present mechanical hazards — keep clear during operation
- Electrical and compressed air components require proper handling
- Use emergency stop (EMO) in case of malfunction
- Follow lockout/tagout procedures during maintenance
Detailed Safety Considerations – 3D Surface Profilometer (Bruker DektakPRO / DektakXT)
The 3D stylus profilometer is a high-precision contact metrology system involving hazards related to delicate mechanical components, motorized stages, vacuum chuck (if used), and sensitive measurement systems. While it is a low-risk instrument compared to deposition tools, improper operation can lead to stylus damage, sample damage, equipment misalignment, and data inaccuracies. Only trained and authorized users may operate the system.
Stylus and Contact Measurement Safety
- The system uses diamond-tipped stylus probes (2 µm and 0.7 µm radius) that are extremely delicate.
- Never apply excessive force to the stylus
- Always start with the lowest possible force (especially for delicate samples)
- Avoid sudden lowering or lateral movement of the stylus
- Do not touch or manually adjust the stylus tip
- Avoid scanning sharp edges, deep trenches, or large step transitions without proper setup
- Stop immediately if stylus drag, vibration, or abnormal resistance is observed
Sample Compatibility and Handling
- Improper samples can damage both the stylus and system.
- Ensure samples are clean, dry, and free of loose particles
- Avoid sticky, soft, or deformable materials unless using ultra-low force settings
- Do not scan samples with debris, dust, or contamination
- Verify step height and surface features are within system limits
- Ensure proper conductive or mechanical mounting if required
Stage Movement and Mechanical Hazards
- The system includes a motorized X-Y stage and scan stage with high precision movement.
- Keep hands clear during stage movement and automated scans
- Ensure sample is securely mounted before initiating movement
- Verify scan path to avoid collisions with sample edges or fixtures
- Do not obstruct stage motion during operation
- Use caution when rotating or repositioning large samples or wafers
Vacuum Chuck Safety (if used)
- The system may include a vacuum chuck for wafer mounting.
- Ensure proper vacuum engagement before scanning
- Do not remove samples while vacuum is active
- Release vacuum slowly before unloading samples
- Verify wafer is properly centered and secured
Force, Scan, and Parameter Safety
- Incorrect scan parameters can damage the stylus and sample.
- Select appropriate stylus (2 µm vs 0.7 µm) based on feature size
- Use low stylus force for delicate or high-resolution measurements
- Avoid high-speed scans on rough or uneven surfaces
- Verify scan length and height range before starting
- Use test scans when working with unknown samples
Optical and Camera Safety
- The system includes a high-resolution camera for alignment.
- Use camera view to verify stylus position before lowering
- Ensure proper illumination to avoid misalignment
- Do not rely solely on manual positioning without visual confirmation
Instrument Protection and Calibration
- This is a high-precision metrology tool requiring stable conditions.
- Avoid vibration, shock, or sudden environmental changes
- Do not modify system calibration settings without authorization
- Ensure system calibration before critical measurements
- Report drift, noise, or inconsistent data immediately
Contamination Control
- Contamination affects both measurement accuracy and instrument performance.
- Use only clean, approved samples
- Avoid introducing oils, adhesives, or residues onto the stage
- Clean stage and chuck after use if necessary
- Prevent buildup of debris near stylus path
Electrical and System Safety
- The system includes electronic control units and sensors.
- Do not open system panels or access internal electronics
- Ensure proper power connection and grounding
- Report any electrical faults or system errors immediately
PPE Requirements
- Lab garments (as required for the area)
- Safety glasses (recommended)
- Gloves when handling samples and wafers
Operational Safety Checks (Pre-Run)
- Sample is clean and securely mounted
- Correct stylus is selected and undamaged
- Stylus is properly aligned using camera
- Scan parameters (force, length, speed) are appropriate
- Stage path is clear of obstructions
- System is calibrated and stable
Post-Operation Safety
- Raise stylus safely after scan completion
- Remove sample carefully without contacting stylus
- Release vacuum (if used) before unloading
- Clean stage and chuck if needed
- Save and back up data
- Log usage and report any abnormalities
Waste Handling and Contamination Control
- Dispose of wipes and contaminated materials in designated containers
- Do not leave debris or residues on stage or chuck
- Maintain a clean measurement environment
Emergency Procedures
- Stylus crash or breakage → stop system immediately and notify staff
- Stage malfunction → halt operation and report
- Abnormal vibration or noise → stop and inspect
- Vacuum failure → stop process and secure sample
- Electrical issue → power down and notify staff
- Do not resume operation until the system has been inspected and cleared.
General Cleanroom Conduct
- Use only approved samples and measurement procedures
- Handle stylus and system components with extreme care
- Avoid unnecessary adjustments or force
- Maintain cleanliness and environmental stability
- Report any issues promptly
The Bruker DektakPRO Advanced Stylus Profilometer offers high-end surface metrology capabilities with precision, flexibility, and automation. Here's a summary of its key features:
System Highlights
- Model: DektakPRO Advanced System (DPRO-A)
- Repeatability: Industry-best 4 Ångström
- Software: Bruker Vision64 Operation and Analysis Software
- Processor: Dual parallel processors for speed and reliability
Measurement Capabilities
- 2D & 3D Profiling: Step height, roughness, and 3D surface mapping
- Stress Analysis:
- 2D film stress measurement (tensile/compressive)
- 3D radial stress mapping
- Automated Measurement: Collects line scans and 3D maps at multiple locations with pre-defined recipes
Hardware Features
- Motorized XY Stage: 150 × 150 mm travel, 360° rotation
- Scan Length: Up to 55 mm (optically flat scan block)
- Stylus Force: LIS 3 sensor, 1–15 mg standard, optional down to 0.03 mg (Nlite+) for delicate samples
- Camera: High-resolution digital color camera with adjustable magnification
- Stylus: Quick-change system (no re-calibration), includes:
- 2 µm radius starter stylus
- 0.7 µm stylus (green-coded for high-resolution/trench)
- Vacuum Chuck: Supports 2–3", 4–6", or 8" wafers
System & Software
- Computer: Bruker-supplied Dell desktop (Intel i5, 16 GB RAM, 512 GB SSD)
- Display: Flat-panel LCD monitor
- Software Modules:
- Stitching: Seamless scans over 6” travel
- 3D Mapping: Real-time and large-area topography
3D Profilometer Training – Session Coverage
During the training session, the following topics and steps will be covered:
-
Overview of stylus-based surface metrology (2D and 3D profiling, thickness, roughness)
-
System components (stylus probes, stage, camera, control system, Vision64 software)
-
Sample requirements and preparation (clean, compatible, properly mounted)
-
Stylus selection (2 µm vs 0.7 µm) based on feature size and resolution needs
-
Sample mounting and alignment using camera system
-
Stylus positioning and safe approach to the surface
-
Setting scan parameters (length, speed, stylus force)
-
Performing 2D line scans and 3D surface mapping
-
Measuring step height, film thickness, and surface roughness
-
Data analysis and interpretation using Vision64 software
-
Saving, exporting, and documenting measurement results
-
Common issues (stylus crash, noise, inaccurate data) and basic troubleshooting
-
Safe stylus handling, stage operation, and system care
-
Cleanup, contamination control, and system readiness
Note: Training is conducted using standard samples, focusing on safe operation and accurate measurement techniques; users are responsible for carrying and advancing their own research projects.
